Creating and deleting contact data fields
As well as the personal details stored against your contacts, you can create new custom data fields to capture additional information.
The more useful data you can collect on your contacts, the more you can usefully segment, target and personalize your communications and, in turn, generate better response rates.
When you create a contact data field, it's available for all contacts in your account, and can be displayed for all lists. This way, all of your lists and contact records maintain the same structure.
Limits of contact data fields
The total number of data fields you can create and their individual limitations:
Data field type | Maximum allowed | Limit for each data field |
Text | 295 | 1,000 characters |
Numeric | 100 | 27 digits
|
Date | 99 | - |
Yes/No | 100 | - |
There are additional default data fields that cannot be renamed. These are referred to as Personal details:
- First name
- Last name
- Full name
- Email*
- Mobile number*
- Gender
- Postcode
- Notes
*Email address (email) and mobile number (mobilenumberid) for a contact are also referred to as channel identifiers. Learn more in Understand contacts.
Create a contact data field
Restricted data field values
There are various words you can’t use to name custom data fields.
The restricted data fields:
- account
- campaign
- campaignid
- contact
- contact_api_id
- contactid
- hcontactid
- hemail
- hemail256
- id
- messagecontent
- mobilenumberid
- notes
- unsubscribed
- uniquecontactid
To create a new contact data field:
- Expand the User menu and go to Settings > Contacts > Contact data fields.
- Select the Custom data fields tab and then select NEW DATA FIELD. The Create a new data field side panel opens.
- For Name, enter a unique name for your contact data field. The name cannot contain spaces.
- For Data type, expand the drop-down menu and select a data type.
There are four data-types: Text, Numeric, Date (use ISO 8601 format), and Yes/No. - Optionally, for Default value, enter a default value for the contact data field where specific data for a contact is not stored.
- For Access, expand the drop-down menu and select either:
- Public
To let your contacts view and amend the data you hold on them for this contact data field in signup forms or the preference center. - Private
To only let users of your account view and amend data held in this contact data field. - For Folder, expand the drop-down menu, and choose which folder you want to save the contact data field in.
- Select CREATE.
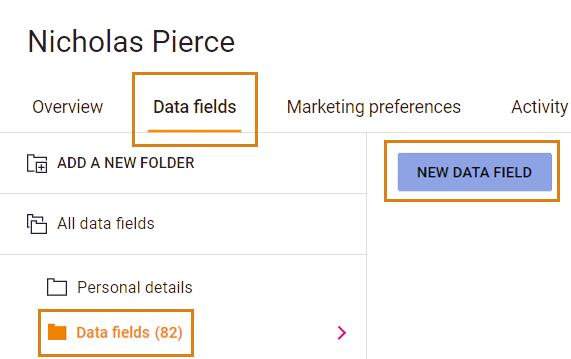
You can also create contact data fields in the Data fields tab of the Customer view.
Delete a contact data field
You can delete any of the contact data fields you create. You can't delete default data fields.
To delete a custom contact data field:
- Expand the User menu and go to Settings > Contacts > Contact data fields.
- Select the Custom data fields tab.
- Find the data field you want to delete and select the X to delete.
Are you sure you want to delete a data field?
Deleting a contact data field also means deleting any of the data you already have stored under it. In which case, you need to be certain that you don't mind losing the data before you delete a contact data field.
If you don’t want to lose any data, export your contact data, and then import the data back in after deleting the contact data field you want to delete.
Edit contact data field properties
You can change the non-critical properties of contact data fields but you can't edit any critical properties.
Critical, non-editable properties | Non-critical, editable properties |
Name | Default value |
Data type | Access |
- | Folder |
Why you can't change critical properties
There's a good reason why we don't allow you to edit critical properties. If you could, any existing information you hold; for example, date and time values, stored correctly under a date data type; could then be switched to a different data type and the data type recognition would fail. If you could change the name of an existing contact data field, then any existing data mapping would break.
This is why they're strictly non-editable.
If you’re looking to change a name or data type, the best way to do this is to delete and then recreate the contact data field, whilst exporting and then re-importing any data that you wish to keep.
To change the non-critical properties of a contact data field:
- Expand the User menu and go to Settings > Contacts > Contact data fields.
- Select the Custom data fields tab.
- Find the data field you want to change the properties of.
- Select the Properties icon.
- Edit your properties for Default value, Access, or Folder.
- Select SAVE.
Change the contact data fields display view
To edit the visible columns or sort order on the contact data fields page:
- Expand the User menu and go to Settings > Contacts > Contact data fields.
- Select the Custom data fields tab.
- Select DISPLAY.
- For Sort by, expand the drop-down menu, and select to sort contact data fields into ascending or descending order based on an attribute, for example, Name, Data type, Access, Created, or Modified.
- For Visible columns, select or clear the checkboxes to view or hide specific columns. The Properties and Delete columns always remain visible. It’s not possible to remove these from the view.
- Select APPLY.